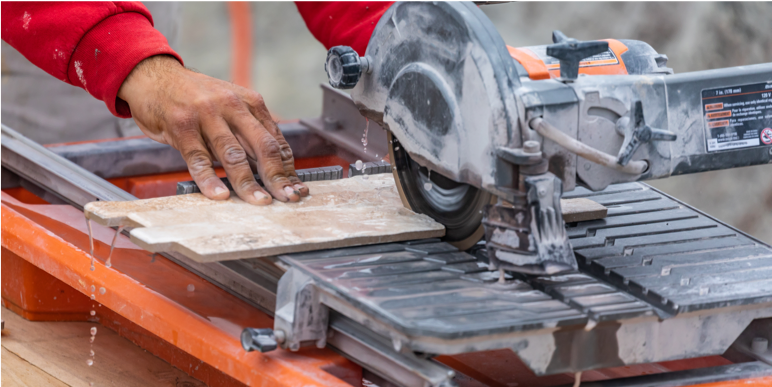
Welcome to our new series of how to guides. Whether you’re a DIY enthusiast or a professional, having the right tools is essential for achieving fantastic results. In this blog post, we’ll explore the world of manual and electric tile cutters and provide you with step-by-step instructions on how to achieve a flawless tile installation. Let’s dive in!Before you start tiling, it’s crucial to grasp the fundamentals. Familiarise yourself with the different types of tiles, adhesives, grouts, and other essential materials. Take accurate measurements of the area you plan to tile, ensuring you have enough tiles to cover the space.Preparing the Surface: Begin by thoroughly cleaning the surface where you’ll be tiling. Remove any dirt, dust, or debris, and ensure it is smooth and level. Use a levelling compound if needed to create a flat surface. This step is crucial for achieving long-lasting and visually appealing results.Choosing the Right Tile Cutter: For smaller tiling projects or intricate cuts, a manual tile cutter is a great choice. These cutters are easy to use and portable, making them ideal for DIYers. However, for larger projects or thicker tiles, an electric tile cutter might be more efficient. Electric tile cutters offer precision and speed, making them a preferred choice for professional tile installers.Using a Manual Tile Cutter:– Measure and mark the tile where you need to make a cut.– Position the tile securely in the cutter, aligning the mark with the cutter’s guidance.– Apply gentle pressure and smoothly score the tile’s surface with the cutting wheel.– Use the cutter’s lever to apply pressure, snapping the tile along the scored line.– For curved cuts, use tile nippers to gradually shape the tile as desired.Utilising an Electric Tile Cutter:– Measure and mark the tile, similar to the manual cutter method.– Adjust the cutter’s guide and blade to the desired cutting depth.– Carefully position the tile on the cutter’s bed, aligning the mark with the blade.– Turn on the cutter and guide the tile through the blade, applying gentle pressure.– Allow the machine to do the work, ensuring a smooth and precise cut.Finishing Touches: After cutting your tiles, dry-fit them in the designated area to ensure proper alignment and sizing. Make any necessary adjustments before applying adhesive. Begin tiling from the centre and work your way outwards, using a notched trowel to apply adhesive evenly. Once the tiles are in place, apply grout, remove excess grout, and finish with a sealant for added protection.Tiling can be a fun and rewarding project, especially when armed with the right tools. Manual and electric tile cutters are essential for achieving precise cuts, ultimately enhancing the overall appearance of your project. Remember to prioritise safety, wear appropriate protective gear, and take your time to ensure a professional finish. Happy tiling!
A Complete Guide on Tiling: Mastering the Art with Manual and Electric Tile Cutters
Previous article
Transform Your Home with Hassle-Free Carpet Cleaner Hire!